Craft
Fun creative activities to do with the kids
Looking for ways to keep the kids occupied at the moment? Whether you’re home-schooling or looking for things to do at the weekends, it can be tricky to think of fun activities for kids to do.
We’ve teamed up with Michael Holland, an ecologist, nature educator and author, to give you some arty ideas to do with the kids.
Taking ideas from his new book, I Ate Sunshine for Breakfast, Michael explains some easy, creative and inexpensive activities for kids to enjoy at home.
Make cornflour slime
Maize is an extremely versatile member of the grass family and can even be used to make slime! Kids love making slime and this recipe made with cornflour and natural colourings is the perfect way to keep little hands busy.

You will need:
- 250g fine cornflour
- 300ml water
- A few drops of food colouring of your choice (or see natural options below)
- A wooden spoon
- A bowl
Natural food colourings:
- Turmeric
- Beetroot powder
- Spinach powder
If you have asthma, wear a face mask whilst pouring the cornflour. as the dust could irritate your lungs.
How to make slime
- Pour the fine cornflour into the bowl.
- Gradually pour water into the bowl and mix until it looks and feels like custard.
- Add about 15 drops of liquid food colouring or a teaspoon of natural food colouring and stir.
- Hit the mixture with your fist. It should become thicker. That’s because slime is a special type of fluid. Unlike most runny things, when pressure is applied to slime, it gets thicker.
- Make your natural slime last longer by keeping it in an airtight container in the fridge.
Make newspaper plant pots
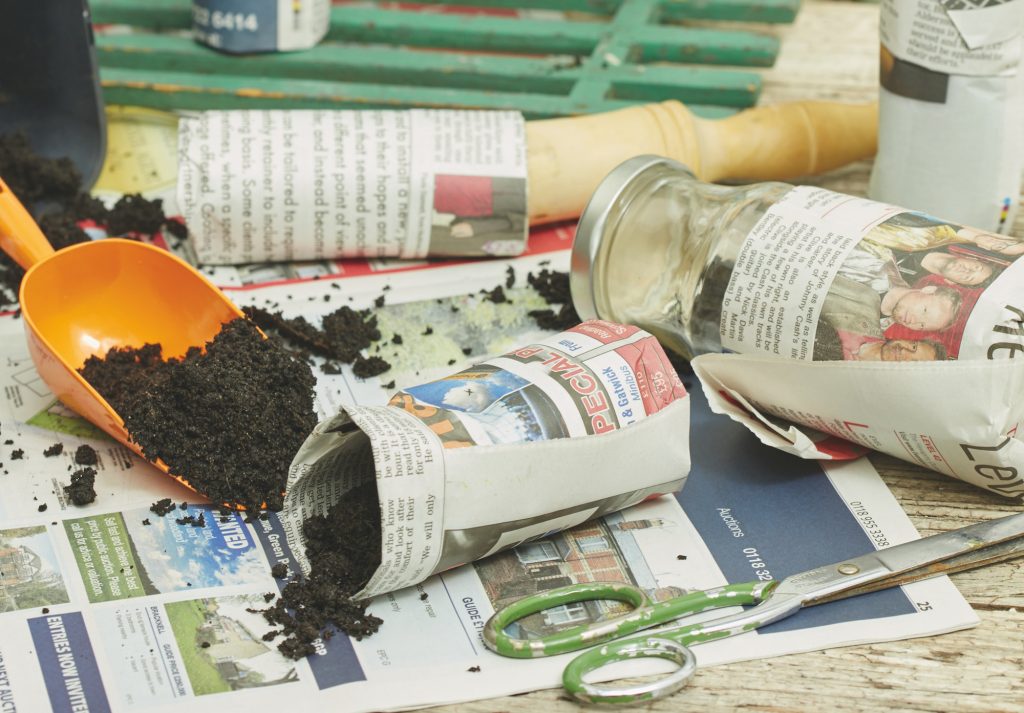
This is a money-saving idea and and also reuses something that would otherwise end up the recycling bin. Newspaper plant pots make a really quirky way of growing and displaying seeds indoors!
You will need:
- One sheet of newspaper per pot (tabloid or broadsheet size)
- An empty, small glass jar
- Some masking tape (optional)
How to make newspaper plant pots
- Lay your sheet of newspaper flat on a table in front of you.
- Fold the paper in half lengthwise (once for tabloid and twice for a broadsheet) to form a long, narrow strip of folded newspaper.
- Lay a small, glass jar on its side and place it on one end of the strip of paper. Roll the newspaper around the jar. The jar is used only as a form to roll the paper around. About half of the strip of paper should overlap the open end of the glass.
- Push the ends of the paper into the open end of the jar. This step doesn’t have to be neat and tidy; just stuff the overlapping newspaper into the jar.
- Pull the jar out of the newspaper.
- Push the bottom of the jar into the newspaper cup, squashing the folded bottom to flatten it (in your hand). This will seal the bottom of your pot. Once the pot has been filled with soil, the bottom will be secure.
- To secure the pot further, you may want to stick a piece of masking tape from the base, up the seam and just over the rim of the pot. This is also a good surface on which to write the name of the seed you have planted and the date.
- Take the jar out and you have a finished paper pot, ready for compost and seeds to be added.
- Due to the nature of the material, these pots will dry out much more readily than a plastic pot, so make sure the compost is always just slightly damp.
Grow your own ‘Shelf Life’ collection
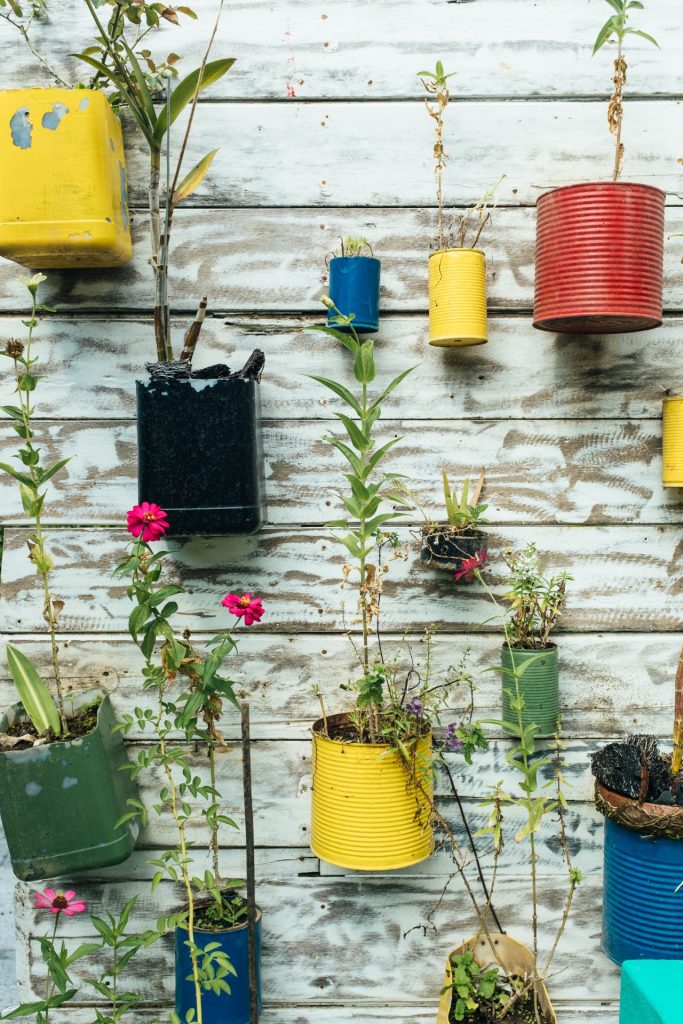
Devised by Michael at the Chelsea Physic Garden in London, ‘Shelf Life’ is a collection of plants growing in the corresponding packaging of foods drinks, cosmetics and medicines. For example, you’ll find an orange plant in a carton of orange juice, or a tomato plant in a ketchup bottle. The display is a reminder of our reliance upon nature and prompts you to ask the question: “How many plants have I used today?”.
Part of the intention of ‘Shelf Life’ is to encourage recycling and reuse. Try to collect seeds from the food you eat and save relevant packaging that would otherwise be thrown away. Remember to keep the labels on so it’s obvious what the plant is. Fill the packaging with soil or potting compost and plant the seeds (or rhizomes) inside.
Tip: When planting, remember that drainage is important. Fill the bottom of any packaging that you’re using with gravel, tiny stones or horticultural grit. This will also weigh the containers down a bit and stop them from toppling over.
Plants to grow
Some seeds may grow more successfully than others. Some reasonably easy to find and grow plants include:
- Apples & Pears – seeds can be taken from the fruit, but you’ll need to put the seeds into the fridge for a few weeks before sowing them (this is called moist stratification).
- Citrus Fruits – Fill a marmalade jar three-quaters full jar with moist compost. Place seeds of lemons, oranges, satsumas, grapefruit or clementines on the surface of the compost. Cover with plastic film and stand in a warm place. After a few weeks, shoots will appear.
Don’t be put off if the seed coats go mouldy – just make some holes in the cling film to let excess moisture out.
Tip: If you are planting into a glass jar, make sure there is a lot of grit or tiny stones at the bottom. - Avocado – soak the stone overnight and then submerge the lower half in fresh water, with toothpicks pushed into the stone in three places to support it. Change the water regularly and watch the stone begin to sprout.
- Potatoes – put some grit or small stones followed by some compost into an empty crisp packet until it’s one third full. Pop in a smallish spud (or even some potato peel) and then fill to almost the top with soil above. Keep the soil moist and see what happens!
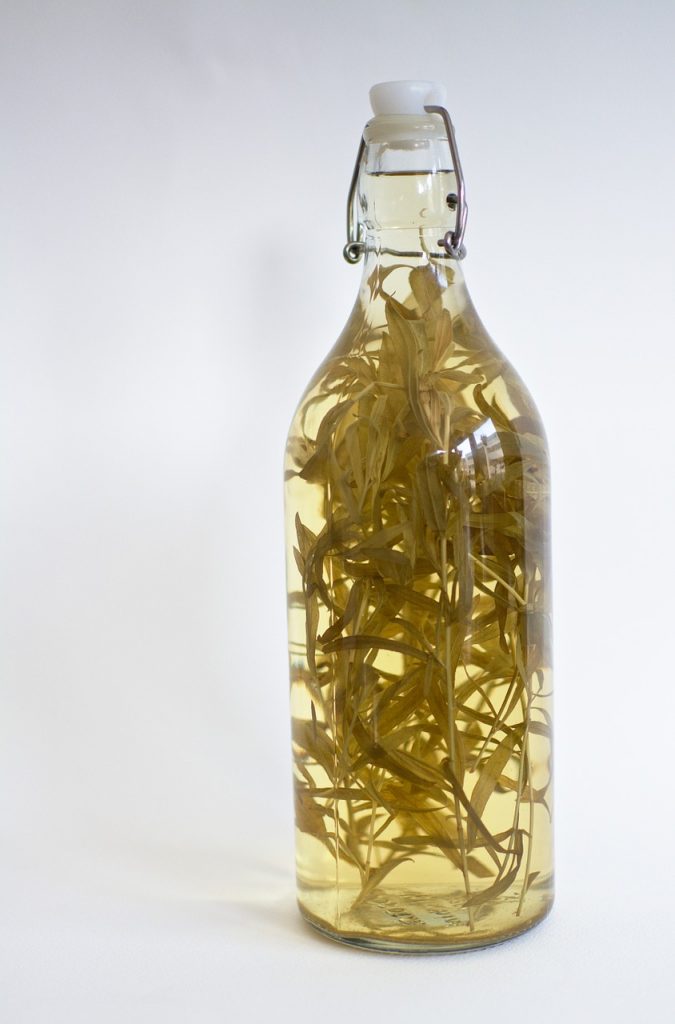
Make a healthy herb vinegar
Herb vinegars have been used to keep us well since at least medieval times and there is much variety of recipes and ingredients.
This recipe can be enjoyed as a teaspoon-a-day or mixed with oil for a salad dressing.
Ingredients for vinegar
Makes 100ml
- Small sprigs of fresh sage, thyme, rosemary, and oregano
- Two cloves of garlic
- One piece of star anise
- One small chilli
- 100ml of vinegar (apple cider or white wine vinegars are best)
The method
Place the fresh ingredients in a bottle or jar and add the vinegar. Make sure all the ingredients are covered by the liquid. Give it a shake and then leave in a darkish place for at least a week before using.
Feel free to experiment with your ingredients. Mint, bay leaves, lavender flowers and black pepper are all additions of substitutions that would give tasty results.
Make a mini garden collage
Activities for kids that help them focus on the minute details of the world is a great way to get them interested in nature. It also requires a little bit of foraging, so is perfect for getting kids out into the garden, or exploring on your daily walk.
Use some scrap card (a cereal box is ideal) and double-sided sticky tape. Create a canvas that is about 5cm x 6cm in size. Peel off the protective plastic film and stick small items found in your garden or local outdoor spaces onto the sticky surface. Feathers, leaves, seeds, small sticks, petals, stones and shells are all welcome here!
The beauty of this activity is that it really helps children to focus on the minute details around us. You can choose to go free-style, or set a challenge to make the first letter of your name, a funny face or a tiny landscape.
Be aware that any vivid colours will fade to brown eventually. Capture the beauty by taking a picture of them once done.
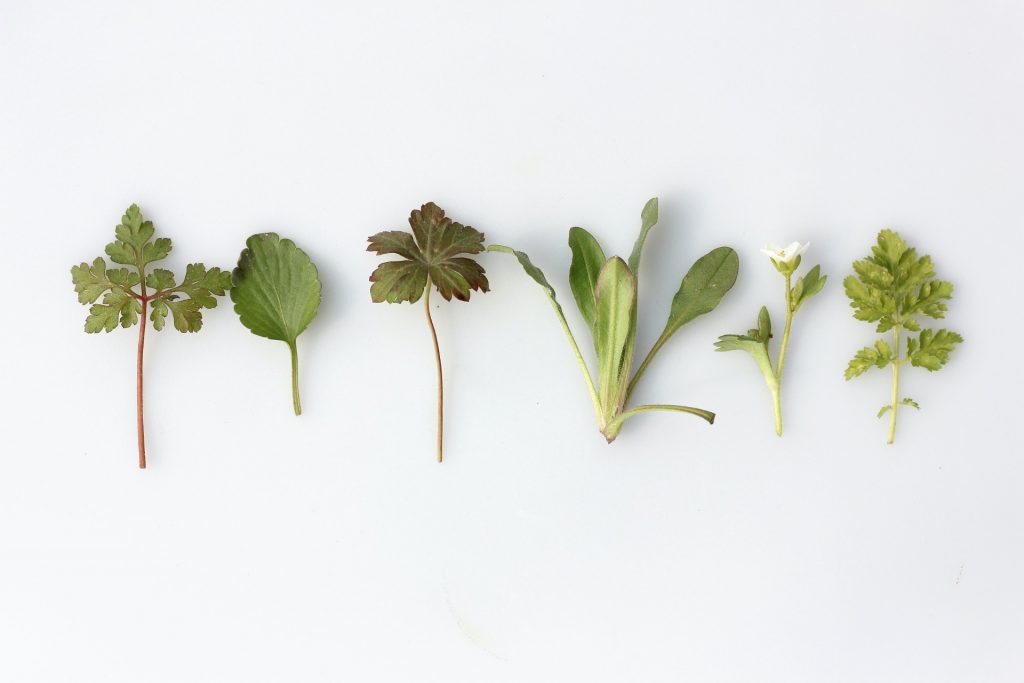
Wild weed bottle garden
A weed is just the term used for a plant that’s growing in the wrong place. This means that any plant can be a weed!
Weed seeds can stay in the soil in a state of dormancy for years. They’ll wait for ideal conditions in which to suddenly appear, as this experiment demonstrates.
You will need: Some garden soil (not shop-bought) and a two-litre clear plastic bottle.
How to make a wild weed bottle garden
- Quarter fill your bottle with soil.
- If dry, moisten the soil with a little water.
- Place the container garden in a cool, light place and . . . wait!
- You may find that, on first glance there is little in the soil in the way of seed. After they germinate, you might be surprised at just how many seeds there must have been in the ’empty’ earth. Can you identify the plants in it?
Read more articles like this
Fun creative activities to do with the kids
Advertisement